
It is really amazing that we now have the ability to create our own version of Facebook or Twitter with just the click of a few buttons. Setting up your own Freedica social network will give your group the security, freedom and privacy that simply does not exist on any platform controlled by billionaires.
How to Install Freedica with Hestia
One of our goals is to make installing a secure social network as easy as possible. In this article, we provide a way to install Freedica using our Hestia Control Panel which has been installed on a Debian virtual private server hosted by Canhost.ca.
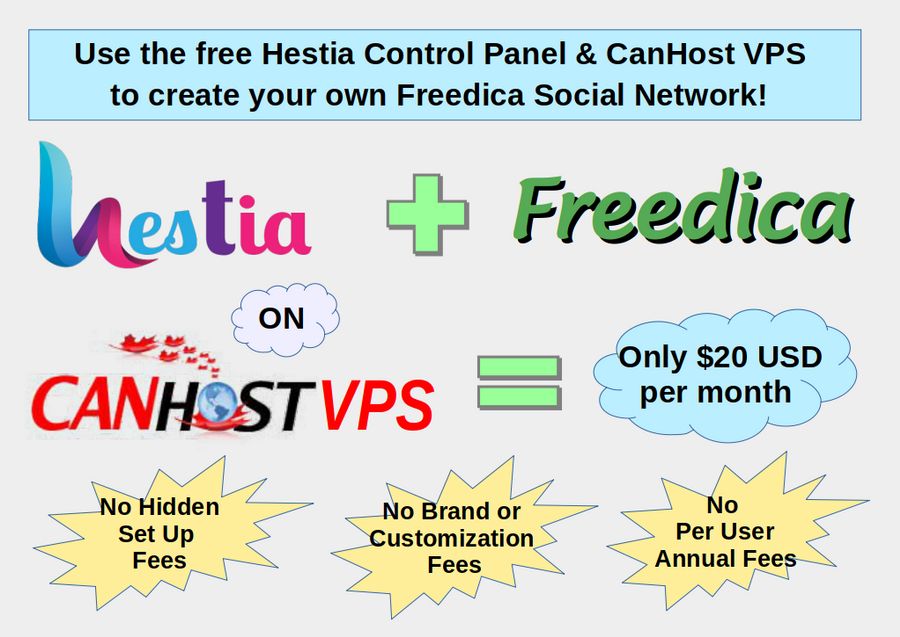
Here is a summary of the steps to create your own secure social network:
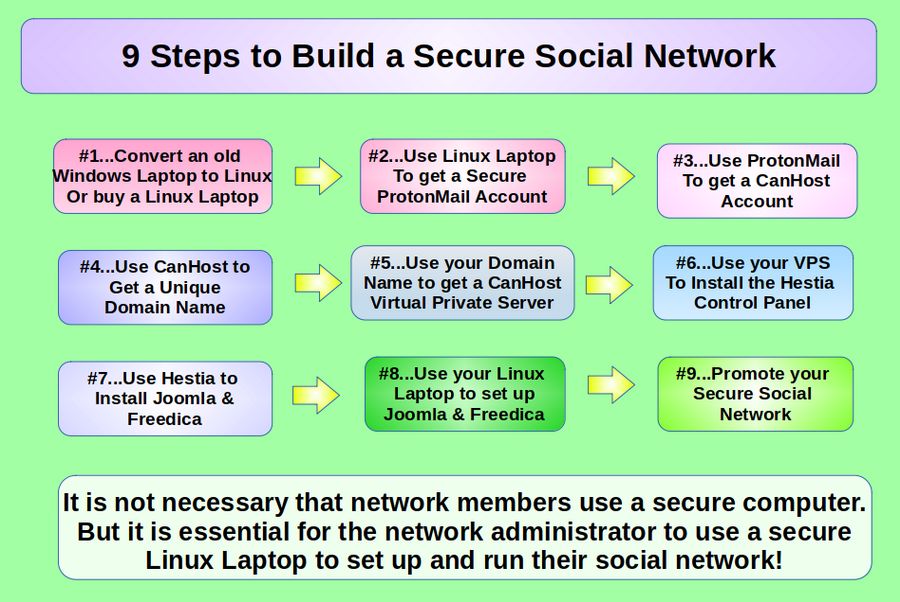
Step 1 Start with a Secure Computer
Most people use a Windows computer to go online. Sadly, the Windows operating system is extremely insecure and easy to hack – subjecting you and your social network to the risk of Windows Ransomware. The sad fact is that all Windows computers have hidden back doors that are easily compromised by hackers looking to take over your social network. By contrast, a Linux Debian computer is extremely secure with no hidden back doors.
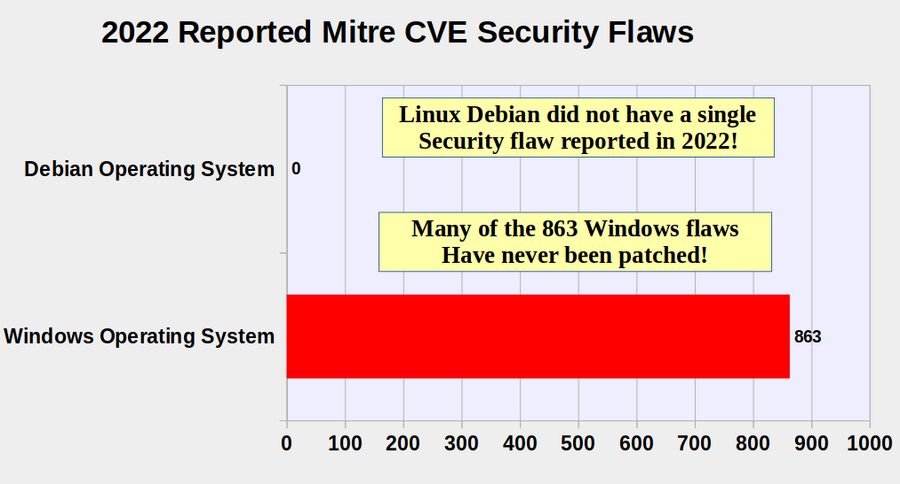
In 2022, Windows suffered from 863 security flaws, many of which allows hackers to remotely take control of your computer – gaining access to all of your website passwords and thus allowing them to take over your social network.
To be clear, folks creating “member” accounts and using the Freedica Network with a Windows computer would not place the entire network at risk. They would only be placing their personal member account at risk. But is it essential that the person creating and administering the Freedica network only log into the back end of the network with a Linux computer. The good news is that most people have an older Windows computer in their closet. These can easily be converted into a secure Linux computer. We covered the process of converting a an older Windows computer to Linux Debian in this article:
https://createabetternetwork.com/2-create-a-secure-foundation/2-1-create-a-secure-linux-computer
Step 2 Connect to the Internet with an Ethernet Cable
Most people connect to the Internet using a WIFI connection. However, there are two major drawbacks to WIFI. The first is that it is not as secure as using an Ethernet cable. The second is that WIFI is not as fast as an Ethernet cable in terms of data transfer. On average, using an Ethernet cable is about ten times faster than using WIFI. This speed boost is extremely important when installing Freedica because Freedica is a big program and it can have problems if it has not been fully installed on your server database. If your laptop does not have an Ethernet port, you can buy a USB to Ethernet adapter for about $20. Plug the USB side into a USB port on your laptop and the other side into your Ethernet cable which is connected to your router.
Step 3 Get a secure free Proton Mail email address
Most people use insecure emails addresses like Gmail dot com. The problem is that you will be using passwords and being sent an admin password during the Virtual Private Server installation process and during the initial installation of Freedica. The only way protect your passwords is to first obtain a free secure Proton Mail email address.
Also do not use a Windows computer to get your Proton Mail account as your Windows computer is simply not secure. Set up a Linux Laptop first. Then use your secure Linux laptop to get your secure Proton Mail account. Then use your Proton Mail address to create your CanHost VPS hosting account and to install the Hestia control panel on your VPS.
This tutorial assumes that you have connected your Linux Laptop to the Internet with an Ethernet cable and then used your Linux Laptop to get a secure Proton Mail account.
Step 4 Use your Linux Laptop and Proton Mail email address to create an account at Canhost.ca
For security reasons, it is very important to not use any server located in the US. Sadly, due to the draconian Patriot Act, any server in the US is subject to take down with a court order or even a court hearing. In addition, it is very important to use a server host that has an easy DNS manager. DNS is the tool used to route your website from your Hestia control panel and to your VPS server. We explain below how to use the Canhost DNS Manager. We have also written an article explaining the benefits of using Canhost at the following link:
https://createasecurewebsite.com/first-steps/2-create-a-secure-vps/2-1-choose-a-secure-vps-host
To create a CanHost account, go to CanHost.ca and click Log in. Then click Signup. Use your secure Protonmail account to create your Canhost account.
Step 5 Use your CanHost account to get a new domain name hosted by CanHost to use for your VPS name server
Use Canhost to obtain your website domain name. This is important. In order to use the Canhost DNS manager, not only does Canhost need to host your VPS but also host your domain name. If you already have a domain name you would like to use for your social network registered somewhere else, you should transfer it to Canhost and then use that domain name to set up your VPS account.
While you can use any domain name, such as mynetwork.com - or subdomain name, such as friends.mynetwork.com, it is not possible to change the domain name later. Therefore give some thought to this question. In our example, we have obtained two primary domain names. The first is called Better Future Network dot com. The second is called Better Network dot us. Each domain name costs about $12 per year or $1 per month.
We will use the first domain name, Better Future Network dot com to set up our VPS server. We will then use the second domain name to set up a Joomla website with the primary domain name, Better Network.us – and use a series of sub domains to set up a series of Freedica social networks. However, you could use the same domain name for all three by using the subdomain ns1.ourwebsite.com for your server, yourwebsite.com for your Joomla website and a different sub-domain, for example, friends.yourwebsite.com for your social network. This will allow us to later create a number of sub-domains such washington.betternetwork.us. In order to eventually set up a statewide or national network of Freedica websites to provide folks with an alternative to Facebook and Twitter.
Step 6 Order a Debian 12 VPS with at least 4 GB of RAM
Once you have your CanHost domain name, from the Canhost Home page, click Hosting, Canadian VPS. Then click VPS EXPRESS 1. Change the Currency to US. Change the RAM from 2 GB to 4 GB. Change the Operating System from CentOS 8 to Debian 12. Change Control Panel from cPanel to No Control Panel.
For Hostname, type ns1.yourdomain.com where yourdomain.com is a domain name pointing at the default Canhost servers. For System Username, use a name with lowercase letters and no spaces. Use a password has at least 10 digits long with at least one capital letter, one lower case letter, one digit and one special character. Write down your VPS username and password as you will need both to log into your VPS server!
The monthly fee for this VPS is about $18 US Dollars. The DISC space is 20 GB. But because 10 GB will be taken up with Debian, Hestia and other programs, this leaves only 10 usable GB. Consider increasing the Disc Space to 30 GB which will increase the usable GB to 20 GB.
Leave the remaining boxes including the SSH box empty and click Continue. Pay for the VPS and wait a few hours. You will get an email letting you know your two custom VPS IP addresses.
Step 7 Change your server domain name DNS Records
Once you know your VPS primary IP address, log into your Canhost account and click Domains, My DNS. Then click on the Edit button to the right of your server domain name to view your domain name DNS records. In our example, the server domain name is Better Future Network.com.
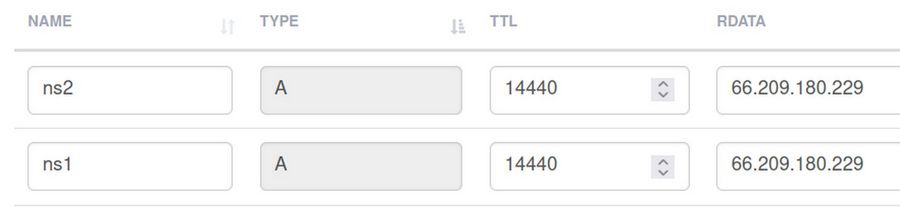
Change the IP addresses of the first four A Records
At the top of the Records table, there are four A records which all point to the Canhost IP address. In the RDATA column, fully delete the Canhost IP addresses. Then copy paste your primary IP address in all four boxes. Then click Save and the bottom of the screen.
Create A records for ns1 and ns2
ns1 and ns2 are sub domains of our primary domain. For example, if your domain is example.com and you want to name your server ns1.example.com, then create the A record for ns1 in the example.com DNS zone pointing to your VPS primary IP address. To create an A Record, click Create Record.
Then change the record type to an A record and type ns1 for the name. Copy paste your VPS Primary IP address and put it in the RDATA box. Then save and close the file and repeat to create an A record for the sub domain ns2.
Create two CAA records for your server domain name
Create CAA records by clicking on Add Record. Use the Type drop down arrow to choose CAA. Then type your domain name such as mywebsite.com into the Name box. Type the number 0 into the Flag box and the word issue into the Tag box. Then type the domain name letsencrypt.org into the Target box. Then click Add Record. Then click Add Record again and create a second CAA record with the Tag issuewild. Then click Save at the bottom of the DNS Zone Records table to save these changes.
Step 8 SSH into your VPS from your home computer terminal
Open a terminal on your home computer. Use the Primary IP address given to you by Canhost in their email to SSH into your new server from our home computer terminal with this command:
ssh yourusername@yourIPaddress>
Example: ssh
Press Enter. Then type yes to accept the SSH connection. Then enter your VPS password and press Enter. Your terminal screen should then display the line that looks something like: david@ns1>.
This means you are logged into your VPS and can edit its settings.
Step 9: Create a Root User and Password
We need to create a Root User in order to install the Hestia Control Panel. However, we need to change the SSH configuration file before we can create a root user. Once logged into your user SSH session, copy paste: sudo nano /etc/ssh/sshd_config
to open the ssh configuration file. Use the down arrow to scroll down to PermitRootLogin. Delete the hash at the beginning of the line PermitRootLogin and set the value to yes:
PermitRootLogin yes
Save this file by pressing the Control key and the lower case o key at the same time, followed by pressing the Enter key. Close the file by pressing Control plus the x key at the same time. To make the new setting take effect, restart the ssh service:
sudo systemctl restart sshd.service
While VPS is running, and still in your user ssh session, copy paste the following into the ssh terminal: sudo passwd root
Enter your sudo user password. Then add a root password typing it twice. Reply should be: passwd: password updated successfully
Log out of the user SSH with exit. Then close the home terminal.
Step 10 SSH into your VPS as the root user
SSH into your VPS from your home computer terminal with this command: ssh root@yourIPaddress>
For example, ssh
When prompted for the password, use the root password you just created. Once logged in as the root user, uninstall the Canhost firewall called CSF with these commands: cd /etc/csf
Press enter, then copy paste: sh uninstall.sh
Then press Enter again. Go back to root with cd /
Next, install the Midnight Commander graphical file manager with this command: apt install mc
Midnight Commander is a graphical file manager that makes it easier to edit and move files in our VPS. We will use Midnight Commander to change some settings after we install Hestia.
Step 11 Install the Hestia Control Panel to your VPS
While logged in as root, copy and paste the following commands:
apt-get update
apt-get upgrade
Then open a browser and go to the Hestia Install page:
https://hestiacp.com/install.html
Uncheck clamav. Then click Submit. The Installation Instructions say: Log in to your server as root via SSH: ssh
wget https://raw.githubusercontent.com/hestiacp/hestiacp/release/install/hst-install.sh
Then copy paste the following command into your terminal:
sudo bash hst-install.sh --port '8083' --lang 'en' --apache yes --phpfpm yes --multiphp yes --vsftpd yes --proftpd no --named yes --mysql yes --mysql-classic no --postgresql no --exim yes --dovecot yes --sieve no --clamav no --spamassassin yes --iptables yes --fail2ban yes --quota no --api yes --interactive yes --force no
Wait for the Thank you screen to appear. Then type Y. Then type your email and FQDN:
Then press Enter. After the installer finishes, it will end with Press any key to continue. Do not press any key! First, scroll up the page and copy paste the Hestia URL and password!!!
Admin URL: https://76.28.214.202:8083
Username: admin Password: ImQwmOHv1rg1Yi9g
Then scroll back down the page and press Enter. Then close the terminal. The server will restart. You do not need to log into the server. Instead, open a browser and copy paste the Hestia URL: https://76.28.214.202:8083
You can also log in with the domain name ns1.example.com:8083
Either way, Firefox will state: Warning: Potential Security Risk Ahead. Click Advanced. Then click Accept Risk and Continue. The Hestia Control Panel Log in screen will appear:
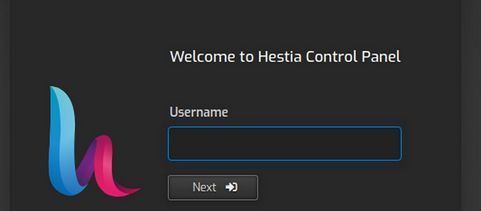
For username, type admin. Then click Next. For password, copy and paste the complex password: ImQwmOHv1rg1Yi9g
Step 12 Change the Background Color of the Panel
The dark panel is hard to read and hard to see on screenshots. Therefore, our first task is to change the background color of the panel to a lighter color. Click on the Settings wheel in the upper right corner. Then click Configure on the left side of the screen.
Then click Basic Options. Then use the Appearance drop down arrow to change from dark to default and click Save. Then click on the word Back to return to the main panel Settings screen.
Step 13 Change the Admin Password
Click on Users in the top menu. Then select the Admin User and click the Edit pencil. Type in an easier to remember password. Each Hestia password must be at least 8 characters long with 1 uppercase & 1 lowercase character and 1 number. Then click Save and Back to go back to the User screen.
Step 14: Use Midnight Commander to improve your PHP settings
Here is a link to an article that explains how to use Midnight Commander to improve your PHP settings:
https://createabetternetwork.com/2-create-a-secure-foundation/2-4-use-midnight-commander-to-change-vps-settings
Step 15: Use the Canhost DNS Manager to create A and CAA records for your Freedica domain name
Use your Linux laptop to log into your Canhost account. Click on Domains. Then, to the right of your primary domain name, click on Manage Name servers. Then click on Manage DNS. This opens the Canhost DNS Manager. By default, the Zone records point to the Canhost IP address. In the RDATA column, delete the first four IP addresses, which are all A records, and replace them with the primary IP address of your own VPS.
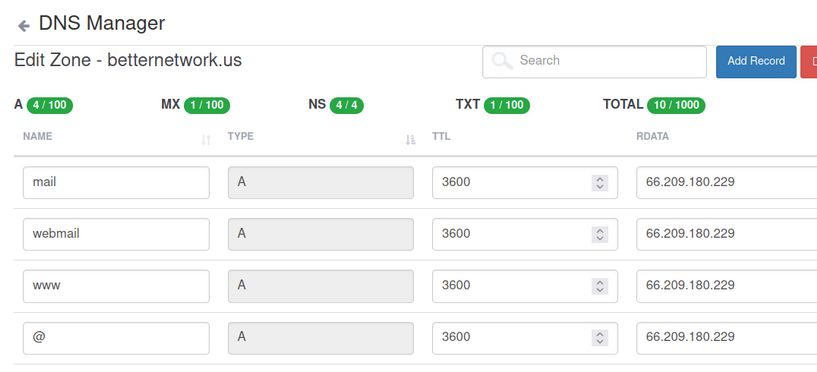
Then click Save. Also add two CAA records. If you want to install Freedica on a sub-domain, click Add Record. Change the record type to A. For this example, we will install Friendica on the sub-domain our.betternetwork.us. Below we added the sub-domain our for our domain betternetwork.us and the IP address of our server.

Type the sub-domain prefix into the Name box and your VPS primary IP address into the RDATA box. Then click Save. We also need to create two CAA records. Click Add Record. For Type, select CAA. For name, type in your domain name.
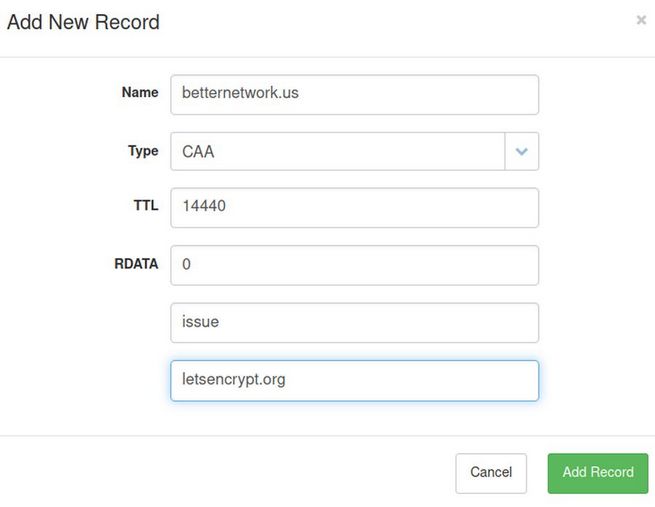
For RDATA, type the number zero (0). In the next box, type issue and in the final box type letsencrypt.org. Then click Add Record. To create the second CAA record, click Add record and repeat the above but change the word issue to issuewild. Then click Add Record. Click Save Changes at the bottom of the page to save the new record. Then click Client Area, Log Out.
Step 16 Make sure Hestia is using the correct version of PHP for the System PHP
The current version of Freedica as of June 2023 is version 2023-06 – which supports PHP 8.1. Log into your Hestia Admin Panel. Then click on the Settings wheel in the right side of the upper menu. Then click Configure. Then click Web Server. Scroll down to System PHP version and make sure it is set for php-8.1. Then click Save. Be patient. Do not refresh the page or change the page until the change is made. The process may take a couple of minutes. Then click Back.
Step 17 Create a Hestia User with the correct User PHP version
Go to Users and click Add User to create a new Hestia user for your top level Joomla website. Then click Save. Then click Back. Then click on the hidden Edit pencil to edit the new user. Scroll down the page to Advanced Options. Make sure the PHP CLI version for this user is set for 8.1. Then click Save. Then click Back. CLI stands for Command Line Interface. The Freedica CRON command will use the Command Line version of PHP to run the CRON job.
Step 18 Use Hestia to create a Joomla website
Click the hidden right arrow to the right of the new user to go to the new Hestia user panel.
Click Add Web Domain. Type in your domain name (in our case, betternetwork.us) and check Create DNS zone and Enable mail.
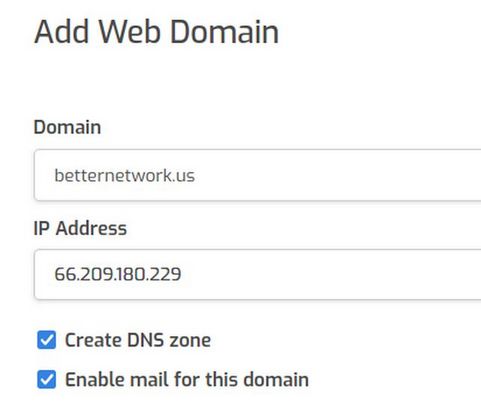
Then click Save. Then click Back.
Step 19 Edit your Domain to add an SSL certificate and set the domain PHP version
Then, to get an SSL certificate for your domain, click the hidden Edit pencil to edit the domain. Check Enable SSL and Use Lets Encrypt. Then click Advanced Options and change the Backend Template from Default to PHP 8.1.

Then click Save and wait for the certificate to be added. After you see the green notice Changes have been saved, click the Back arrow.
Step 20 Create a Server Connected Email Address
Click Mail. Then click on the hidden Edit Mail Domain icon. Click Enable SSL and Use Lets Encrypt. Then click save and wait for the certificate to be issued. Then click Back. Then click on the hidden Plus sign to add a new mail account – for example the word info which would give us a custom email address of
Step 21 Create a Database for our Joomla website
Click DB. Then click Add Database.
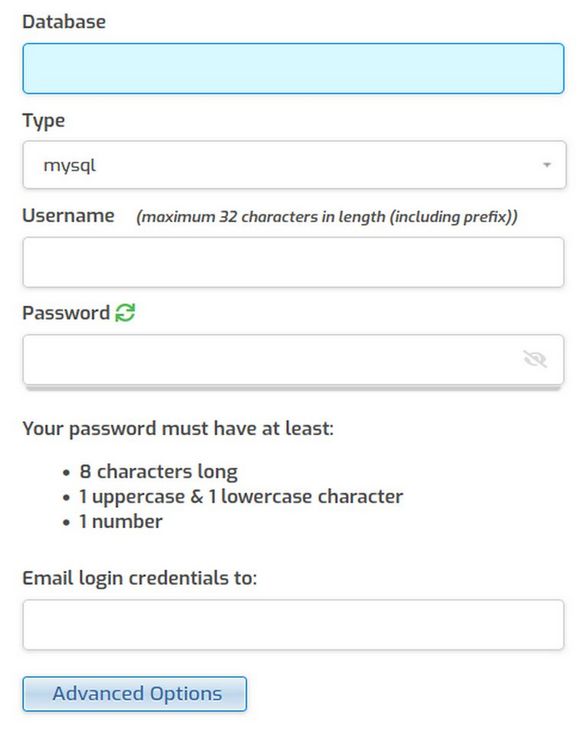
Add a database name, a database username and database password. Copy paste all of these (including the Hestia User Prefix) to a Libre Writer document. We will need this information later when installing our Joomla website. Then click Save and Back.
Step 22 Install Joomla
Go to Joomla dot org to download the latest version of Joomla. Then in your Hestia User account, click Files. Then web. Then your domain name. Then public_html. Then click Add Files.
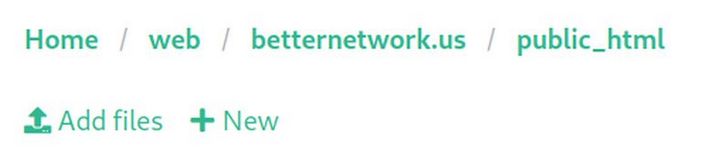
Navigate to your zipped Joomla folder and select it. Once it loads, click on the three dots and click Unzip. Scroll down and delete the zipped folder. Rename index.html as old-index.html and rename htaccess.txt to .htaccess (dot ht access). Click Exit to Control Panel. Then click the arrow icon to go to your website. This brings up the Joomla Installer.

Change the language to US English and type in your site name. Then click Setup Login Data. Enter your real name, Joomla admin username and password and type in the server connected email address we just created. Then click Setup database and enter your database user, password and name. Then click Install Joomla.
Step 23 Joomla Initial Configuration
Click Open Administrator. Then log into your Joomla website dashboard. Click No to Statistics. Then simplify the dashboard by unpublishing Latest Actions, Privacy Dashboard, Logged in Users, Popular Articles, Recently Added articles, Sample Data. Then click Global Configuration, Site Tab. Scroll down and change Use URL rewriting from No to Yes.
Then click on the System tab and change Session Lifetime from 15 minutes to 150 minutes. Then click Save and Close.
Then click on your website name in the upper right corner of the Dashboard to view your site. Note that the Login form is published by default. To unpublish the Log in form, in the Dashboard, click Content, Site Modules. Then click on the green checkmark to unpublish the log in form and main menu.
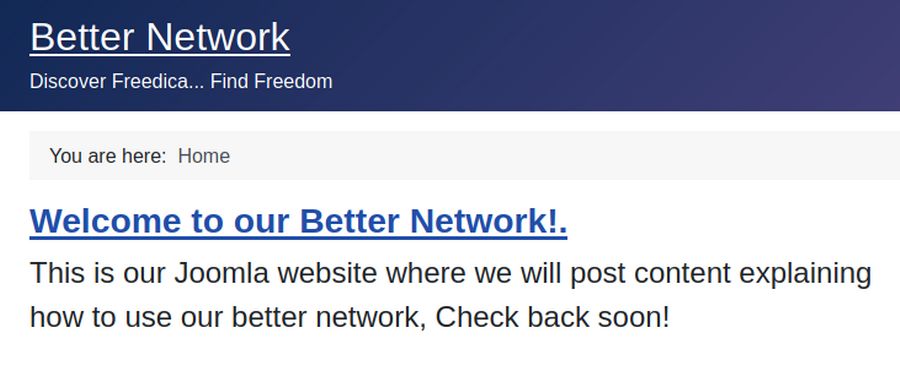
From the dashboard, click Template Styles and click the Cassiopeia template to edit it. Click Advanced. Then type in the title of your website. Change the layout to Static. Then click Save and Close. Then click Content, Articles, New. Give the article a title such as Welcome to our Better Network!. Give it a description. Click Featured Yes to put the article on our home page. Then click Save and Close.
Click Options and hide the category, author, publish date, tags and hits. Then click Save and close. Click Menus, Main Menu. Then click on the Home menu item to edit it. Click Page Display. Hide the Page Heading. Then type the website name into the Browser Page Title. Then click Save and Close. Then in the User Menu, click Log out. Then click on the website to view your initial Joomla website.
For more information on how to create and add content and images to a secure Joomla website, visit our course “Create a Secure Website.” Here is the link: https://createasecurewebsite.com/
Step 24 Download Freedica Package Installer Zipped File
Now that we have our Joomla website, we are ready to install Freedica on our subdomain our.betternetwork.us. Here is a direct link to our Freedica Package Installer free download page:
https://freedica.org/free-downloads
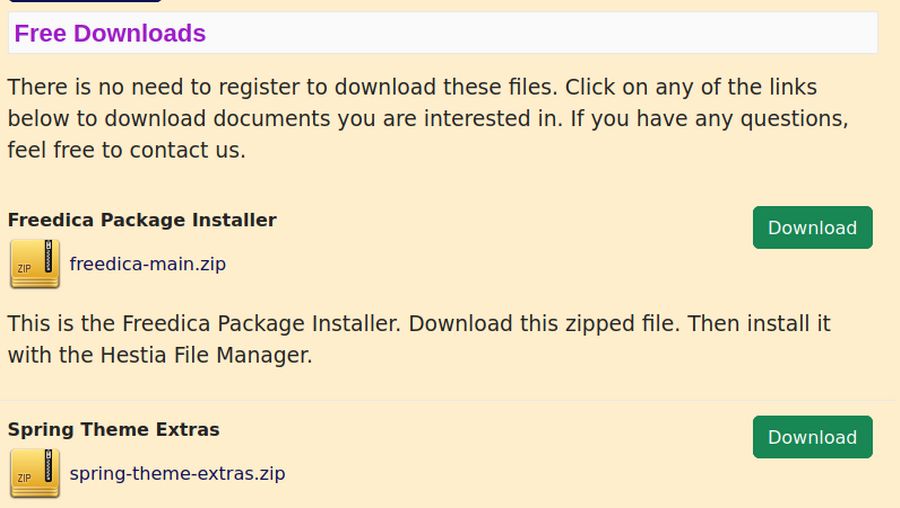
Click Download. This will place the Freedica zipped file into your Downloads folder. We will install this zipped file using the Hestia file manager after we create our Freedica Database.
Step 25 Use Hestia to add your Freedica Subdomain
Go to your Hestia User account that we just used to install our Joomla website. Then click Add Web Domain. Type in the subdomain and the parent domain. For example: our.betternetwork.us.
Then click Create DNS zone. But do not check Enable mail. Then click Save and Back. Then click on the hidden Edit Pencil icon for the subdomain to add an SSL certificate to the subdomain.
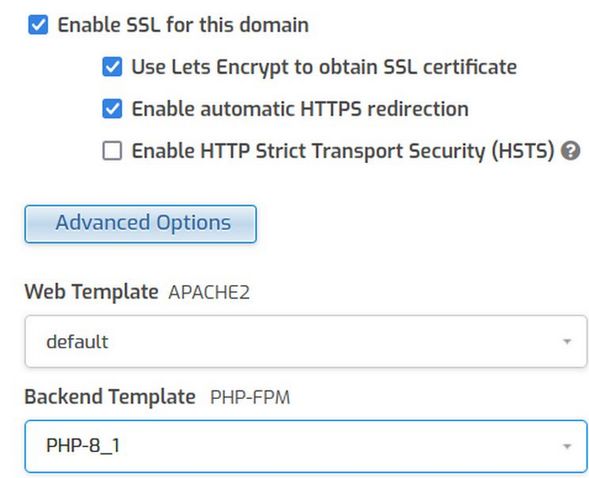
Also click on Advanced Options to change the back end template (PHP-FPM) from default to PHP 8.1. Then click Save. Then click Back.
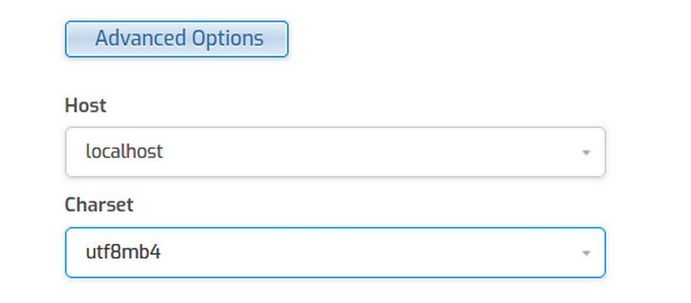
Step 26 Create a Freedica Database with Hestia
Click DB. Then click Add Database. Create a Hestia blank database noting the hostname (which by default in Hestia is localhost), the database name, the database username, the database password. Before you click save, copy paste all of these to a Libre Writer document. In addition, in Advanced Options, change the charset from utf8 to utf8mb4.
Copy paste the db name, username and password into a Writer document. Save the document because we will need this information when we create our Freedica website. Click Save and Back.
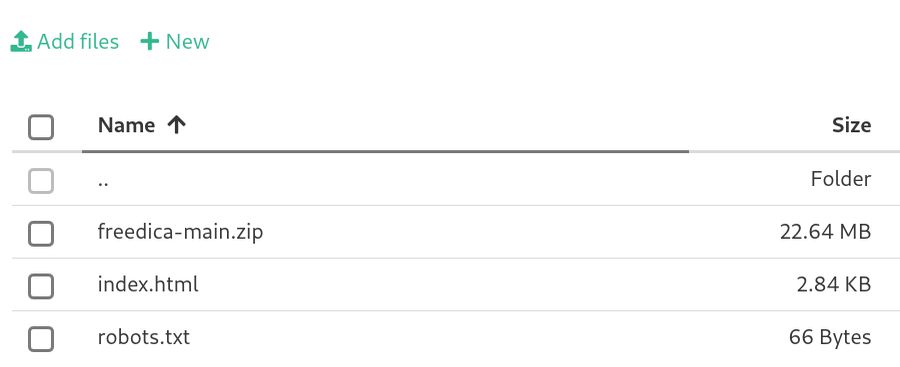
Step 27 Install the Freedica zipped file with the Hestia File Manager
Back in the Hestia User account, click Files to open the Hestia File Manager. Then click web. Then click your subdomain name. Then click the public_html folder. By default, it has only two files called index.html and robots.txt. Click Add Files. Navigate to and select the Freedica zipped file. Wait for it to load. Here is the result:
Then click on the three dots to the right of the Freedica zipped file and click Unzip. Unzipping creates a freedica folder. Click on the three dots to the right of the zipped folder and click Delete. Then click the Freedica unzipped folder to open it. Then click on the top checkbox to select all of the files and folders.
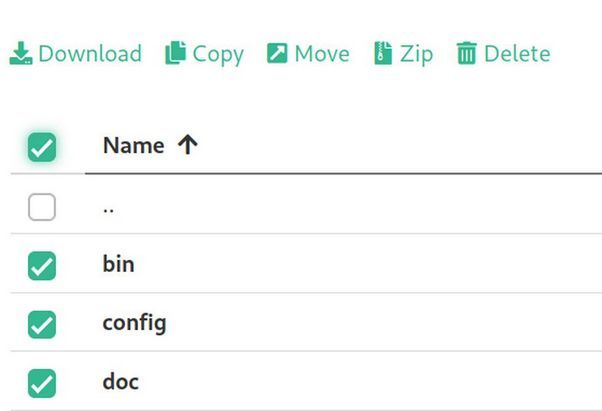
Then click Move. This will bring up the select folder screen. Click the + sign to the left of the word web.
Then click the + sign to the left of your subdomain name. Then click the public_html folder. This will move all of the files from the freedica unzipped folder to the public_html folder. Go to the public_html folder and delete the now empty freedica unzipped folder.
Step 28 Rename .htaccess-txt file
Click on the three dots to the right of the htaccess-txt file and click Rename. Then delete the four letters .txt to rename it .htaccess. Also click the three dots to the right of index.html to rename it old-index.html.
Step 29 Go to the Freedica install page
Open a new browser tab and enter your network website domain name. The first screen is the System check.
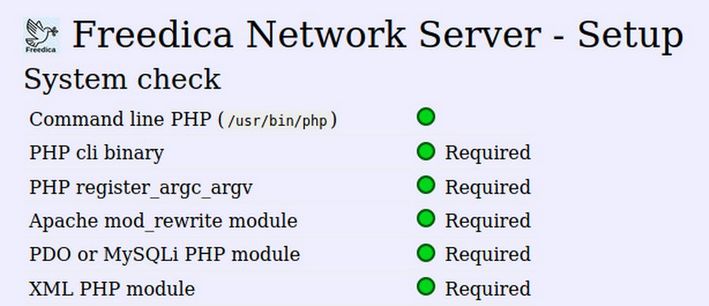
There may be this error: GNU Multiple Precision PHP module required but not installed.
GMP is the GNU Multiple Precision extension. SSH into your server as root. Install the gmp development library first by copy pasting this command:
apt install libgmp-dev
Then install the extension by copy pasting this command:
apt install php8.1-gmp
If a dialogue pops up, select Keep the Local version currently installed. Then restart apache in the ssh session:
service apache2 restart
Then type exit to exit the server. Then use Hestia admin settings to restart php8.1-fpm. Then reload the Freedica install check page or click Check again at the bottom of the page. There should now be no errors.
Click Next. The next screen is shows the paths. Assuming these are correct, click Submit. The next screen is the database information:
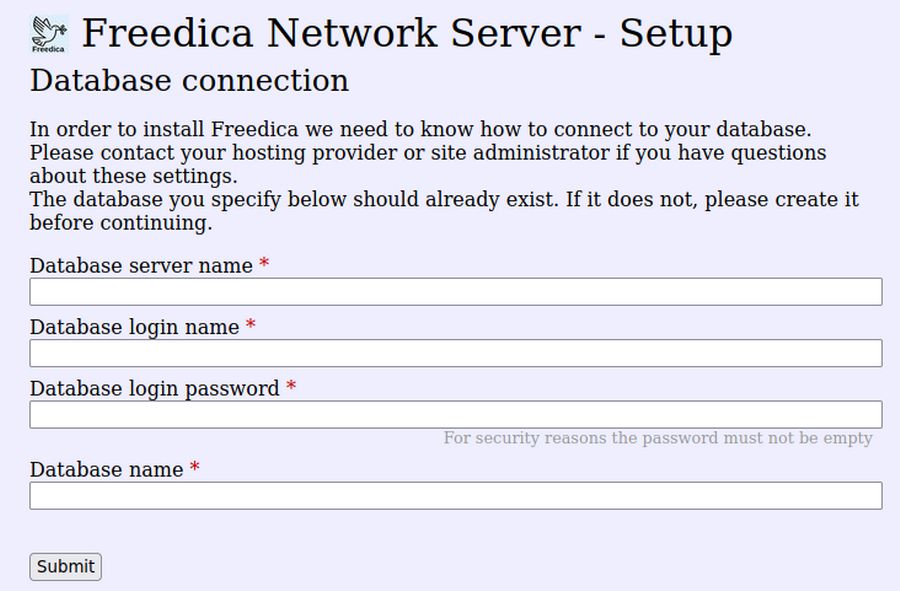
The server name is localhost. Then add your Hestia DB username, password and database name. Then click Submit. The next screen is the Admin information:
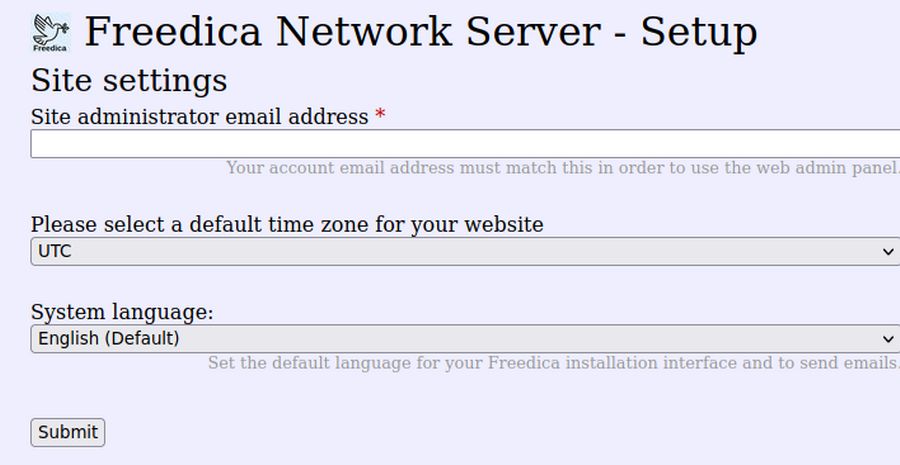
Add your server related email address and time zone. However, before you click submit, make sure you are connected to the Internet with a high speed and preferably Ethernet cable.
Then click Submit. Then wait for about a minute for your new Freedica social network to be created. The final set up page is called Installation Finished:
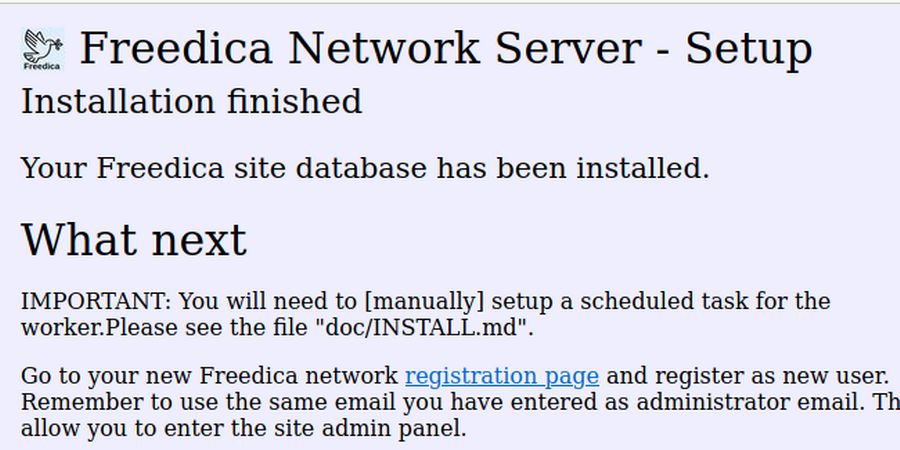
The click the link to your Registration page to register as new user. Remember to use the same email you have entered as administrator email. This will allow you to enter the site admin panel. Click on the blue link to the registration page.
Step 30 Fill out the admin registration form
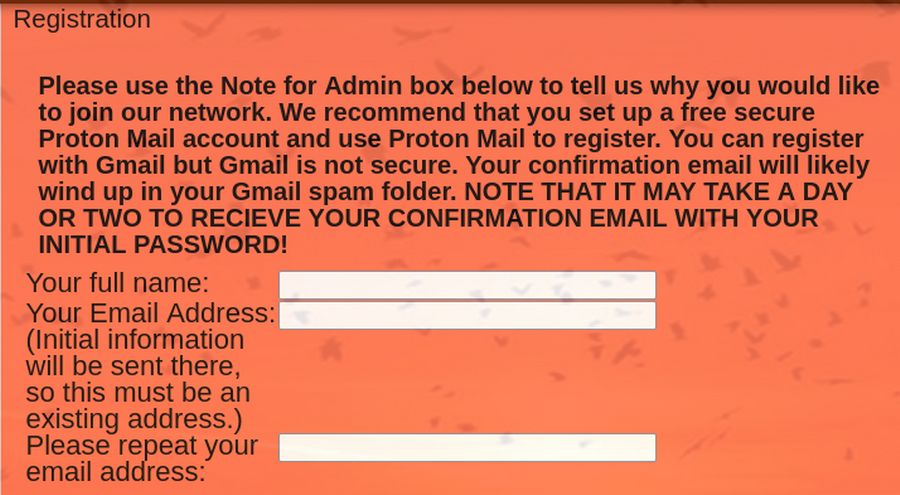
The initial colors and images will match the Freedica Demo site. We will review how to change these later. For now, enter your first and last name and your admin email address twice. Here is the bottom part of the registration form:
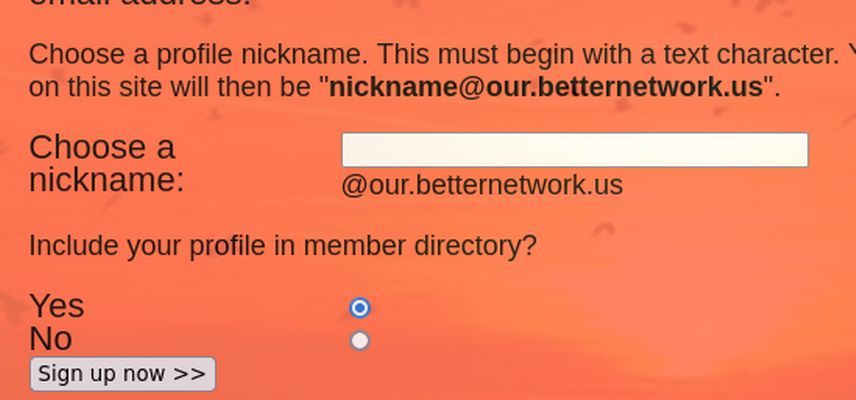
Type a nickname using lower case letters with no spaces. Then click Sign up now. This notice should appear:
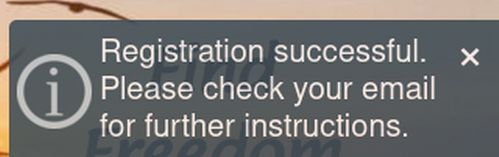
This means your Registration has been accepted.
Step 31 Copy your temporary password
Clicking Sign Up Now takes you to your Network Home page. For a few seconds, this message will appear: Registration is successful. Check your email for a temporary password. So go to your admin email address to see the following new acceptance email:
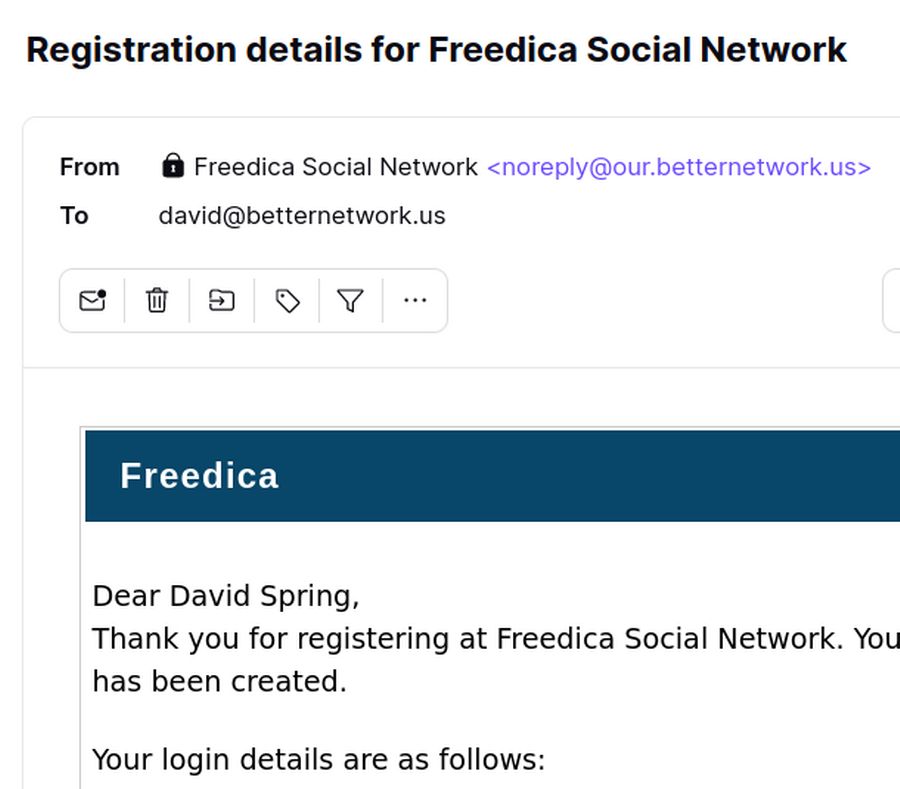
Open this email (which may be in your spam folder) and copy the initial password.
Step 32 Log into your Freedica site with the initial password
Go back to your network Home page and click Login. Then type your nickname and initial password into the log in box:
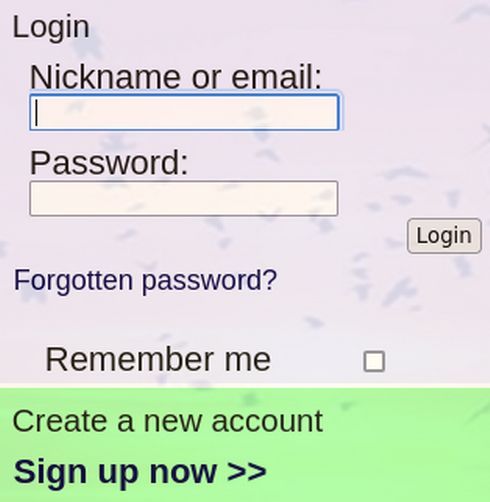
Click Login to get to this Settings, Profile page.
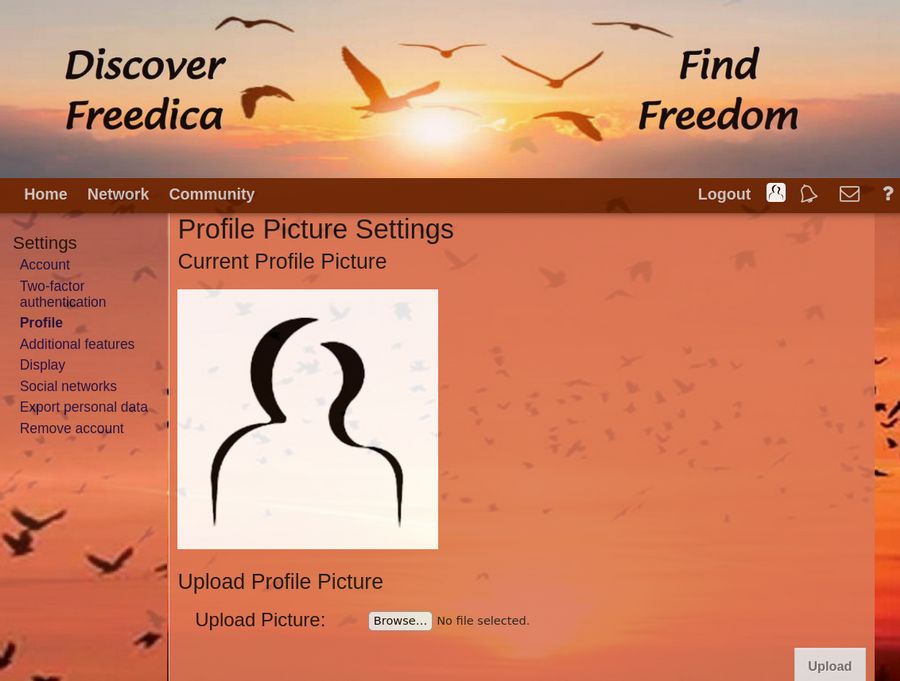
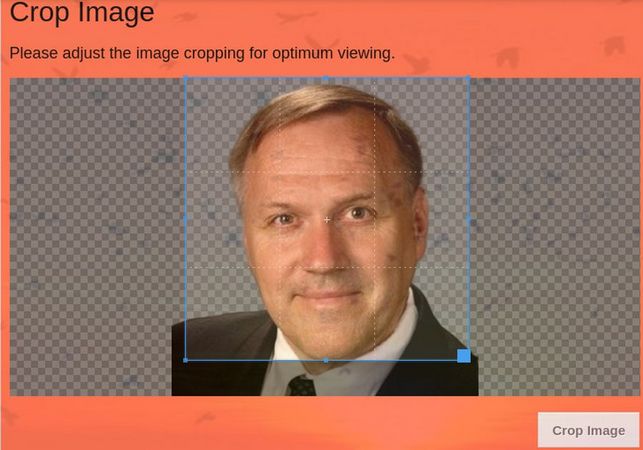
Click Browse to go to your file manager to select your Profile Picture. Then click Upload. Then use the crop function to crop your picture.
Congratulations! You have finished the initial Freedica Installation process!
What’s Next?
In our next article, we will review some important initial admin site configuration and customization steps.