
One of the most important features of Freedica is its Member Moderation system – which allows you as the network administrator to control who is allowed to join your social network. This system allows you to protect your members from harassment from bots and trolls so common on top-down social networks. In this article, we will explain how to use the Member Moderation system.
Member Moderation
In our previous article, we went to Admin, Site, General Information, Registration to change the registration system from Open to Requires approval. In addition, there is a box where you can customize the information at the top of your registration form explaining to new members what your network policies are for accepting new members. For example, you might only accept application from your own state. Or you may require new members to state an interest in a particular goal such as improving the economy. Here is what these Registration settings look like when you are logged in as the Network Administrator:
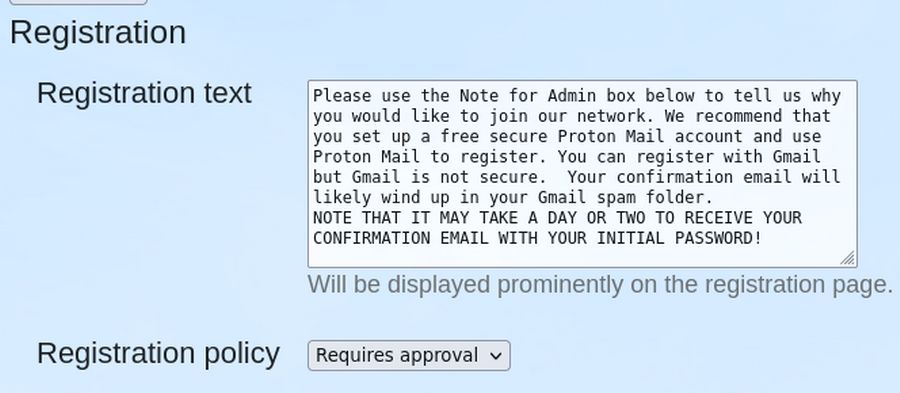
Change the text to match the needs and interests of your group. Then log out and view your Network Home page.
New Member Registration
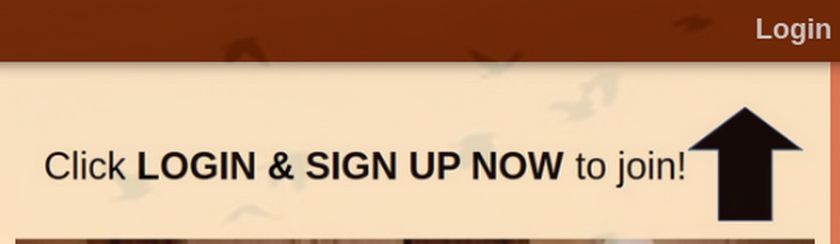
One of the first challenges new members face is figuring out how to register. To help them get to the registration page, we provide two important clues. First, at the bottom of the text on the left side, it says to click LOGIN or click HERE to join!

Click on the word HERE to verify that this link goes directly to the Registration page. Then click on Home to go back to the Network Home page. Because many visual learners do not actually read text, the second important clue is just above the Welcome image:
If you create a new Welcome image, please keep this information at the top of your Welcome image. Click Login to see the Login form:
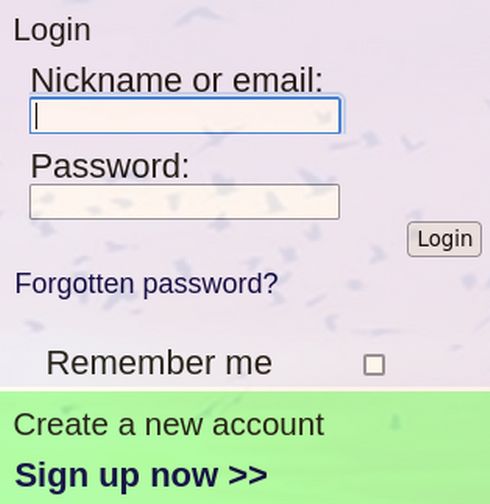
To create a new account, click Sign up now.
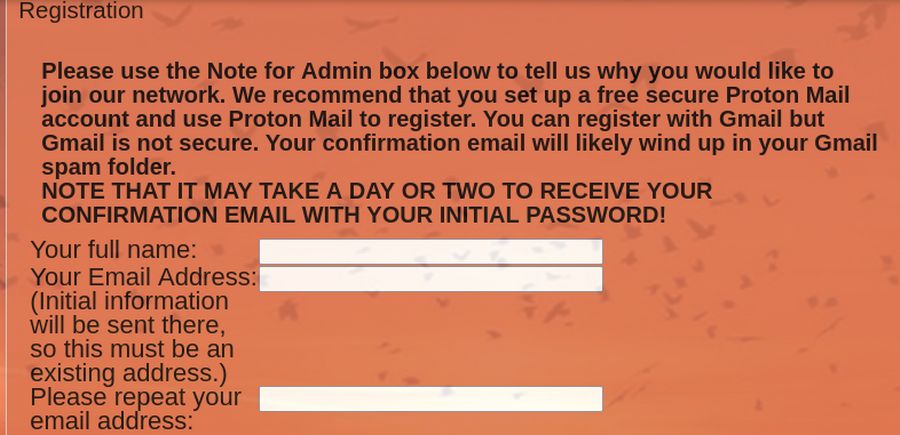
Here is the top of the default Freedica Registration form:
It is important to test your new member registration system by signing up as a new member. You can use the Hestia Control Panel to create a custom email address for this purpose. So that we can also test the Member Connections process, we have added two custom email addresses called
Enter a first and last name for the test member such as Test1 Member. Then enter their email address twice. Here is the bottom half of the registration form:
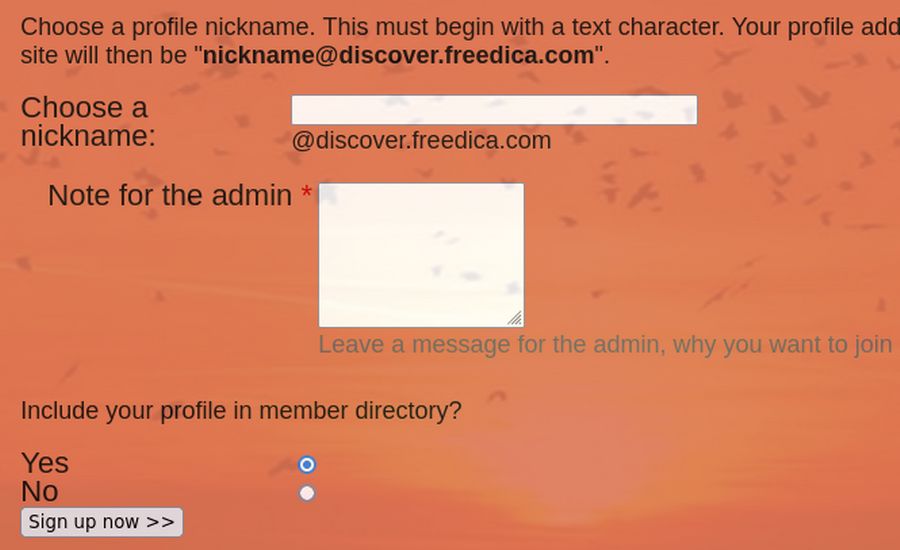
To keep the testing process simple, use test1 for the nickname.
Below the nickname is a required box where applicants can type in one or two sentences explaining why they would like to join your network. Type test1 is not a troll or a bot.
Below this box is an area where members can choose whether they want to be listed in the Member Directory. The default setting is Yes. New members can change this setting later if they want. One does not need to be a member to see the list of members. Hover your pointer over the Question mark to see three links:
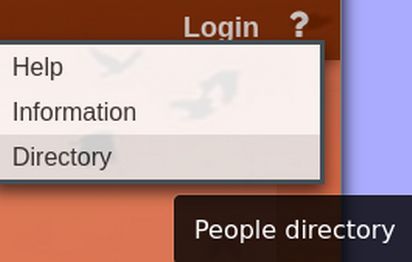
Then click on Directory.
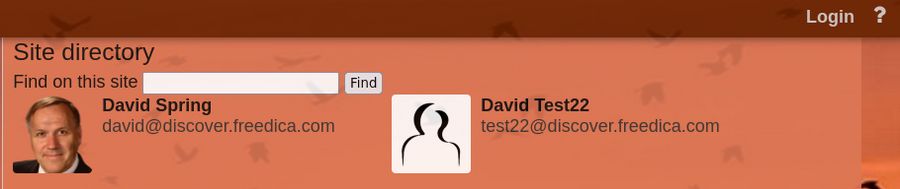
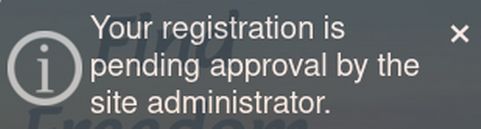
The directory has a Member search box which we will explain how to use later in this article. Click the back arrow to go back to the registration form which you will need to fill out again. Then click Sign up now. A popup will appear letting the applicant know that their registration is pending approval:
Clicking Sign up now will take new members to a page called New Member Tips. Here is a link to this page:
https://discover.freedica.com/help/New-Member-Tips
As the network administrator, you can use the Hestia Control Panel to customize the information in your own New Member Tips page. This page explains that they will receive a registration email with their password but that they will not actually be able to log in until they have been approved by a network administrator. It should also explain how they can create a Member Profile Image which is the first thing they will do when they log in for the first time.
The New Member Tips page also includes a left side menu which has links to several other articles which explain how to use the Freedica Network to fill out the member profile page, make friends, join groups, create Topic tags in posts, add images and videos to posts, ask questions on our forum, create events and several other topics.
Next log into your test1 member email account to see the email sent to new members.
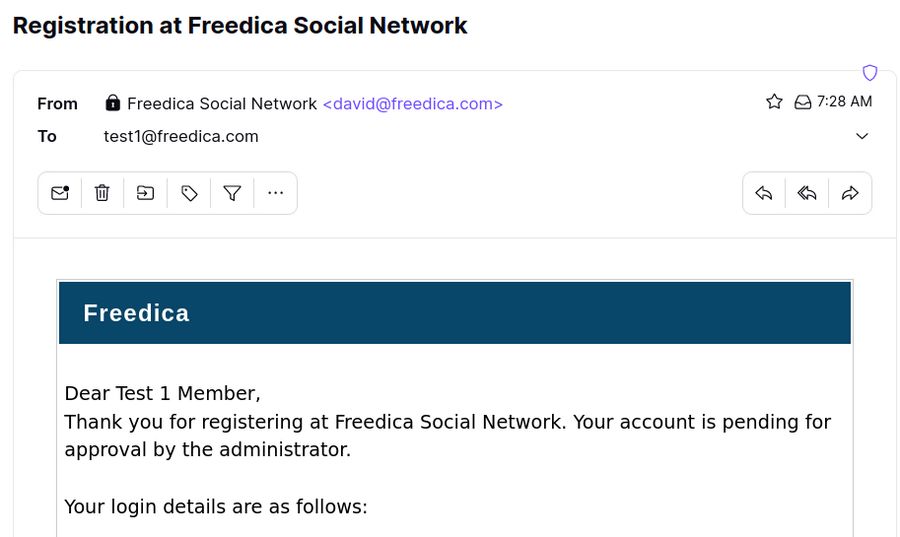
After you approve this new member, they will receive a second email that provides this advice:
Thank you for registering at Freedica Social Network. Your account has been created.
Password: Sent in a previous email
You may change your password from your account "Settings" page after logging in. Please take a few moments to add some information to your default profile so that other people with similar interests can easily find you. For more information about important first steps, click on the Help Question Mark. Then click Network Tips and read our Welcome article.
Thanks - Freedica Social Network Administrator
Customize the Welcome emails
You can change the text for the initial email and the confirmation email using the Hestia File manager by going to view/lang. Then change the language strings. Also make the same changes at src/model/user.php Line 1532
Test the Member Moderation System
Copy the test1 member initial password which is a randomly generated password such as Kraiqumn5375.
Then go back to your network and log in as the administrator where you will see the following notice:
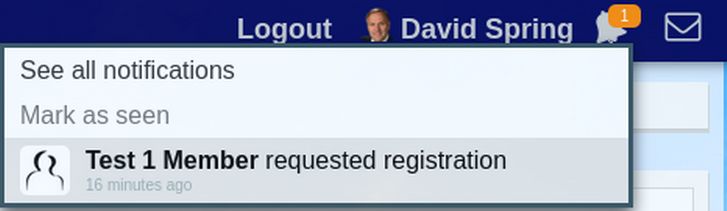
Click on Test 1 Member to see the request.
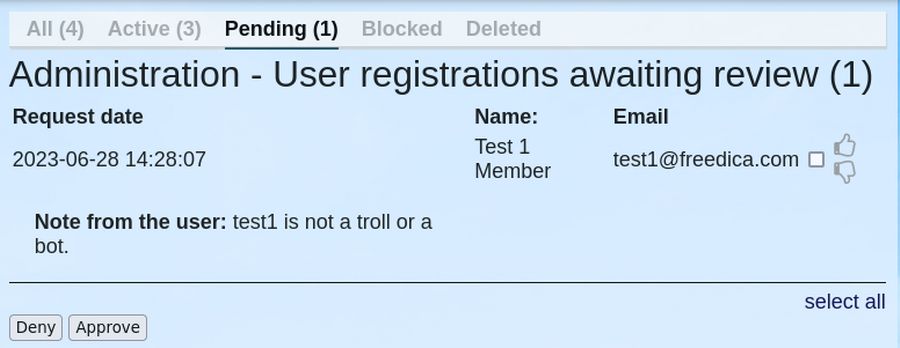
Read the note from the applicant. If you need any further information from the applicant, you can use their email address to send them an email asking for additional information. For now, check the box to select the new member. Then click Approve. Then click the Active Tab to see that the Test 1 Member was added to the list of Active accounts:
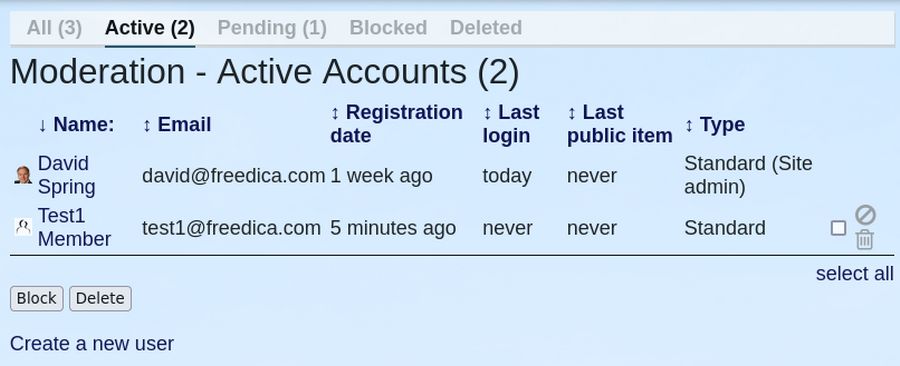
This screen also gives you the ability to temporarily block or even delete any member. You can also reach this screen any time you are logged in as an Administrator by clicking in Moderation in the Member menu.
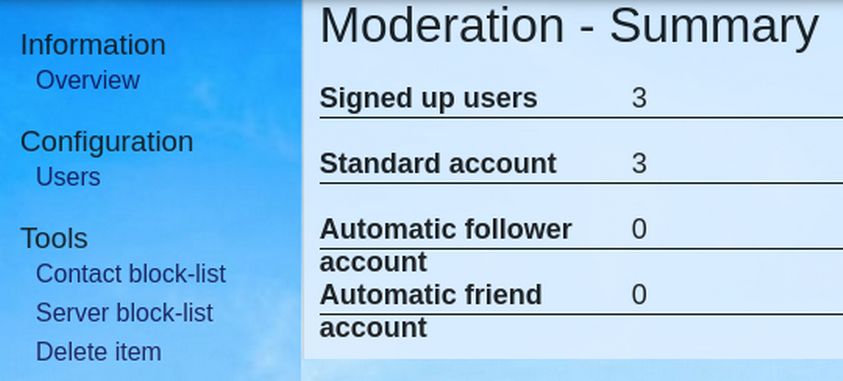
Click Users in the left side menu which displays a table of all active and pending members:
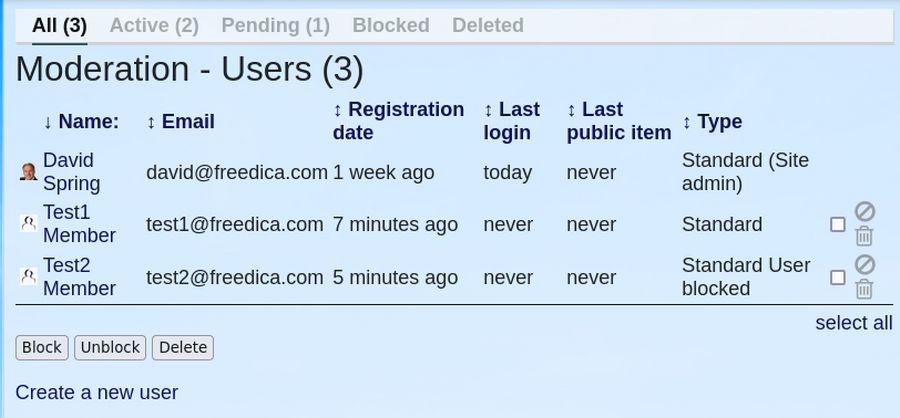
To delete a member, check the box on the right and then click Delete. This warning will appear:
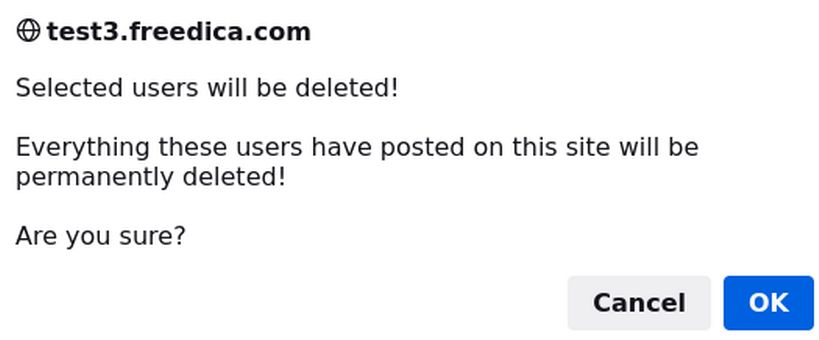
Note that this process can not be reversed once started. Click OK. This will place the member in the Deleted table. However, they will not actually be deleted for 6 days.
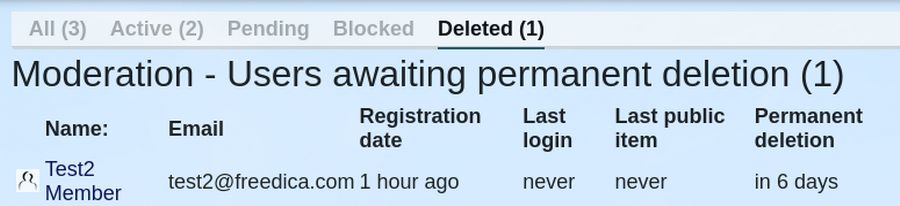
The reason 6 days are allowed to delete an account is to allow time for notices to be sent to contacts of the deleted member to let them know that the member was deleted. After the elapsed time of six days, all posts, messages, photos, and personal information stored on your network will be deleted. This will also remove the deleted member profile from the network member directory. In addition, the username of the deleted member cannot be reissued for future sign-ups to prevent anyone else from impersonating the deleted member.
Admin Deletion of a Member Post
In addition to members being able to delete their own posts, admins can delete member posts that do not comply with forum rules. From the Moderation page, click on Delete Item. Here you can delete a post. If the item is a top-level post, the entire thread of additional comments will also be deleted.
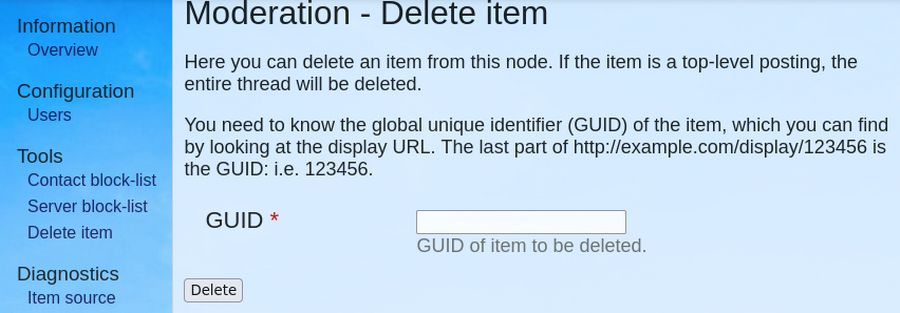
You need to know the global unique identifier (GUID) of the item, which you can find by going to the post and looking at the URL displayed in the browser navigation bar. The last part of https://example.com/display/123456 is the GUID: i.e. 123456.
Add another Admin User
It is common to have more than one administrator to help with New Member Registration and Moderation. You can expand the list of email addresses by any existing member email address you want. For example, to add test1 member as an admin for your network, first register them as a member. Then go to the Hestia File Manager and click config, local.config.php to edit this file. At about Line 26, you will see “admin_email’. Place a comma after your existing admin email address. Then carefully type in the email address of test1:
'admin_email' =>
Then save the file. Then log in as test1 and verify they can now see the admin and moderation menu items in the member menu.
What’s Next?
In our next article, we will review some tips for new members.